The Complete Guide to Interior House Painting in the Bay Area
Thinking about refreshing your Bay Area home with a new coat of paint?
Maybe your living room walls are looking tired after years of California sunshine. Maybe you’re getting ready to sell and want to retire those dated colors. Whatever brought you here, you’re in the right place.
Interior painting can completely change how your home feels. It’s one of the most powerful, visible upgrades you can make. The catch? It only works if it’s done well.
We’ve been painting homes in the Bay since 1995. That’s over 30 years of working in everything from Victorian flats in Rockridge to modern lofts downtown. Along the way, we’ve learned exactly what it takes to deliver interior painting that looks beautiful and actually holds up.
In this guide, we’re covering:
When interior painting makes sense for your home (and when it doesn’t)
How to choose the right paint types and finishes for each room
What the professional painting process really looks like
Realistic timelines, costs, and what to expect
How to find a qualified interior painter in Oakland
Color selection tips, prep advice, and maintenance strategies
Whether you’re planning to hire a pro or you just want to understand what quality work should look like, this guide will help you make smart decisions for your Bay Area home.
Let’s dive in.
Is Interior Painting Right for Your Bay Area Home Right Now?
Not every home needs painting today. Before you invest time and money, it helps to know if this is the right move for right now.
Clear signs it’s time to repaint
A few things are easy giveaways.
Fading paint is the big one. This is especially common in rooms with big west-facing windows (hello, Oakland sunshine). If your once-vibrant colors now look washed out or uneven, it’s probably time.
You’ll also see visible wear and tear in high-traffic areas. Hallways, stairwells, kids’ rooms, and entryways take a beating. If you’re seeing:
Scuff marks that won’t clean off
Worn spots where furniture rubs
Areas that look dingy no matter how much you scrub
…fresh paint can make a dramatic difference.
Then there are life changes.
Moving into a new home? Most Oakland buyers repaint right away to make it feel like theirs.
Getting ready to sell? Fresh, neutral paint is one of the best returns on investment.
Staying put but life’s evolving (new baby, empty nest, or just “we’re ready for a change”)? That’s reason enough.
Specific things to consider
Bay Area homes come with a few quirks that influence interior painting.
Many properties in neighborhoods like Temescal, Montclair, and Piedmont were built before 1978, which means potential lead paint. That requires special, certified handling.
Victorian and Craftsman homes often still have original plaster walls that need specific prep and repair.
If you’re in one of the newer lofts or warehouse conversions, you may be dealing with concrete, exposed brick, or metal, which all need the right primers and products.
When painting might not be your best move (yet)
Sometimes, the walls need more than just paint.
If you’re seeing:
Significant water damage
Visible mold
Structural cracks
…those issues need to be addressed before you paint. In some cases, drywall or plaster repair (or replacement) will be needed first.
Wallpaper removal is also its own project. It’s absolutely doable (and something most pros can help with), but it adds a step before paint.
If you’re planning to sell within a year or two, it can also be smart to talk to your real estate agent. Sometimes strategic painting makes a big impact. Sometimes you can be more selective.
The ROI perspective
Interior painting usually returns 50–70% of its cost when you sell. But honestly, the real value is in how you feel living there every day.
The right colors can make your home feel brighter, cleaner, larger, and more inviting. For homeowners planning to stay put for a while, that quality-of-life boost is often worth more than the spreadsheet ROI.
Understanding Interior Paint Types & Finishes
Walk into any paint store and you’re instantly surrounded by choices. Let’s make them less overwhelming.
Paint types: what actually matters
For most interior projects today, latex (water-based) paint is the standard.
Why?
It dries quickly (often 1–2 hours between coats)
Has minimal odor
Cleans up with water
Performs very well in our Bay Area climate
Modern latex paint is far more durable than older formulations. We use it for roughly 95% of interior projects.
There are a couple of other options you’ll hear about:
Oil-based paint still exists, but it’s used less often for interiors. It creates a very hard, durable finish that can be ideal for some trim and doors. The tradeoffs: strong odor, long drying time (6–8+ hours between coats), and mineral spirits required for cleanup.
Hybrid (water-based alkyd) paints aim to combine the best of both worlds: the durability of oil with the cleanup and lower odor of latex. They’re more expensive but can be an excellent option for trim in higher-end interiors.
Finish sheens: the decision you’ll live with every day
This is the choice you’ll notice the most once everything is done.
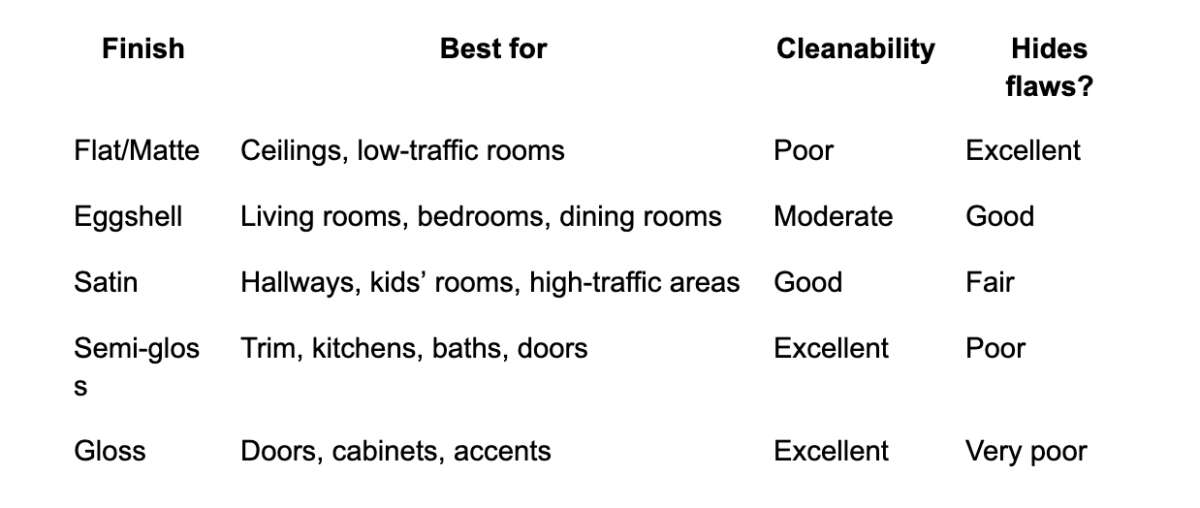
Flat (or matte)
Absorbs light instead of reflecting it
Hides wall imperfections extremely well
Great for ceilings and low-traffic rooms
Downside: it’s tough to clean without leaving marks. In older homes with textured walls, flat can be very forgiving, but it’s not ideal for hallways, kids’ rooms, or kitchens.
Eggshell
Soft, subtle sheen
Cleans better than flat
Still hides minor flaws
This has become the default for a lot of living rooms, dining rooms, and adult bedrooms. It’s a nice “middle ground.”
Satin
Noticeably more luster than eggshell, but not shiny
More cleanable and durable
Good for hallways, kids’ rooms, and high-traffic areas
The tradeoff is that satin will highlight imperfections more than eggshell or flat.
Semi-gloss
Quite a bit of shine
Very durable and easy to clean
This is the standard for trim, doors, and cabinets. It’s also often used in kitchens and bathrooms where moisture and grease are factors. On walls, semi-gloss will show every flaw, so it’s usually reserved for specific design choices.
Gloss
Maximum shine and reflectivity
Extremely durable
You’ll rarely see gloss on interior walls in Bay Area homes. It’s more common on front doors, furniture, or very modern accent pieces where high shine is intentional. It only looks right when the prep is perfect.
Low-VOC and eco-focused options
If you live in the Bay Area, you’ve probably heard about VOCs (volatile organic compounds). Traditional paints release VOCs as they dry.
The good news: low-VOC and zero-VOC paints are now very common, and their performance is essentially on par with traditional products.
Benefits:
Minimal odor
Better for indoor air quality
A safer choice for homes with kids, older adults, or sensitivities
Aligned with California’s environmental regulations
We use low- or zero-VOC options for most interior work. They’re a natural fit for Oakland homes.
Why product quality matters more than you think
Here’s the part that’s easy to underestimate: cheap paint looks cheap and doesn’t last nearly as long.
Premium lines from brands like Benjamin Moore, Sherwin-Williams, and Dunn-Edwards cost more per gallon, but they typically offer:
Better coverage
Richer, more consistent color
Smoother finish
Longer lifespan (often 7–10 years instead of 3–5)
If you’re planning to stay in your home, good paint is one of those things that pays you back over time.
Room-by-Room Painting Considerations
Not every room has the same needs. What works perfectly in your bedroom could be a headache in your bathroom.
Here’s how to think about each space.
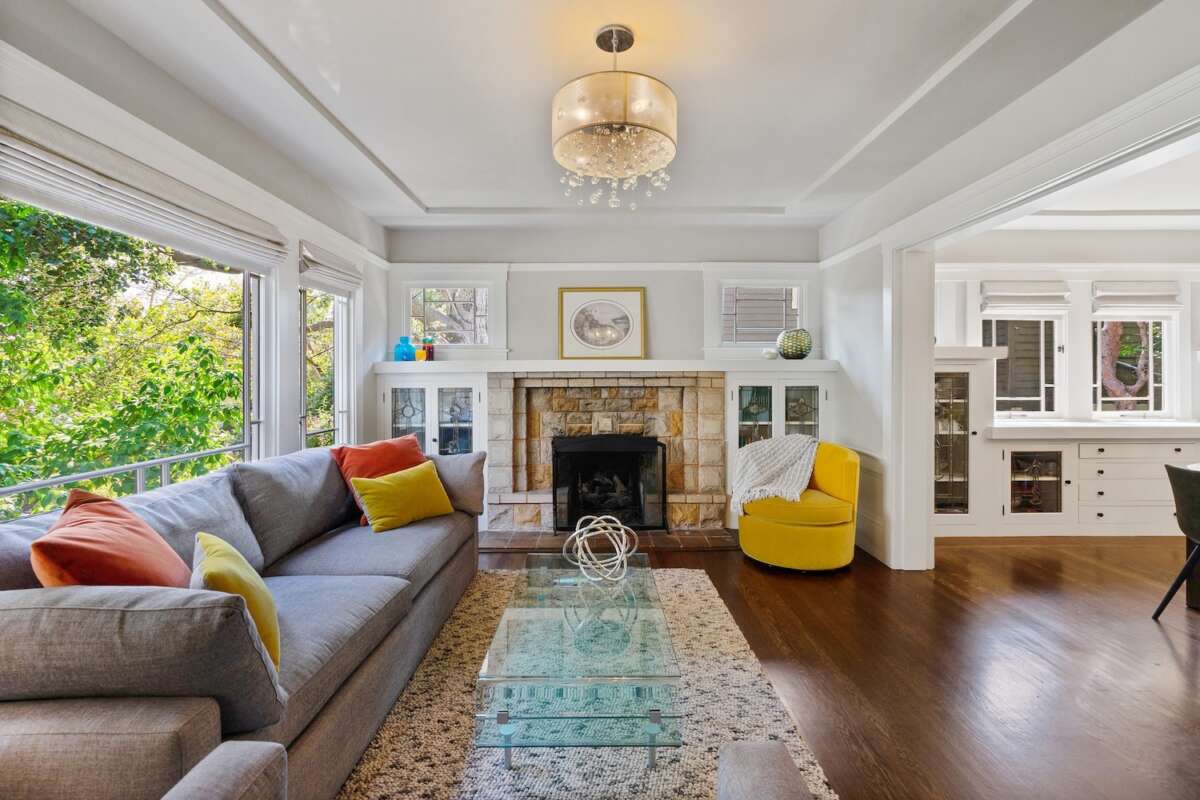
Living rooms & dining rooms
These rooms often set the tone for your whole home.
Color: Lighter colors can make smaller Victorian or Craftsman rooms feel larger and brighter. Deeper shades can create a cozy, dramatic feel in spaces with good natural light and higher ceilings.
Lighting: Pay attention to windows. Large west-facing windows can wash out some colors in the afternoon. Always test your colors at different times of day.
Finish: Eggshell is usually ideal for walls—cleanable, but still soft and forgiving. Trim is typically semi-gloss for durability and contrast.
Bedrooms: your personal retreat
Bedrooms are where you have the most freedom to play with mood.
Color psychology: Many local homeowners lean toward calming neutrals, soft whites, or muted blues in primary bedrooms. Kids’ rooms go brighter and more playful. Teen rooms… are their own world (and easy enough to repaint later).
Finish: Flat or eggshell tends to work well. Traffic is low, and you’re not washing bedroom walls often. A softer sheen helps maintain a restful feel.
Kitchens: function + style
Kitchens demand durability as much as aesthetics.
Finish: Satin or semi-gloss is usually the way to go. You’ll be wiping down walls for cooking splatters, grease, and everyday life.
Moisture and ventilation: In older Oakland homes, kitchens don’t always have great ventilation. Moisture-resistant paints help protect against peeling or bubbling in those environments.
Color coordination: The wall color has to cooperate with cabinets, counters, and backsplash. Many homeowners choose neutral walls that complement the cabinetry rather than competing with it.Open floor plans: If your kitchen flows into a living or dining area, think about how colors connect. Sometimes one color throughout is best; sometimes you use complementary shades.
Bathrooms: moisture is the main battle
Bathrooms are tough on paint.
Humidity: Showers create a humid environment where the wrong paint can peel, bubble, or grow mildew quickly.
Product choice: Use bathroom-specific paints with mildew resistance, or at least satin/semi-gloss with good moisture resistance. This is especially important in older Oakland homes with limited ventilation.
Prep: Any mildew needs to be treated before painting. If not, it will come back through the new paint.
Color: Smaller bathrooms benefit from lighter colors that make the space feel larger. Larger, more modern baths can handle deeper or richer tones.
Hallways & stairwells
These are your home’s “highways,” and they show it.
Finish: Satin is your friend here. It stands up better to constant contact—shoulders, hands, backpacks, laundry baskets—you name it.
Color: Lighter colors help narrow halls feel more open, which is especially useful in older homes. In Craftsman-style houses with rich wood trim, you’ll want wall colors that frame and respect that woodwork.
Complexity: Stairwells can be more involved than they look. Height, angles, and access all add time and complexity.
Ceilings: the fifth wall
Most Oakland homes default to white ceilings, and there’s a good reason for that.
White reflects more light
Makes rooms feel taller and more open
Plays nicely with most wall colors
Flat finish is standard on ceilings, because it hides imperfections and keeps light from bouncing around in distracting ways.
Some Bay Area homes have natural wood ceilings or exposed beams. If the wood is in good shape and not already painted, most people choose to preserve it rather than paint over it.
Trim & molding: the finishing touch
Trim does a lot of heavy lifting in terms of character.
Finish: Semi-gloss is the go-to here. It stands up to daily contact, cleans easily, and creates a subtle contrast with the walls.
Color: White or off-white trim is classic and works with almost any wall color.
Historic homes: In Victorian or Craftsman homes, contrasting trim can really showcase the detailed woodwork. This is where clean lines and careful brushwork really matter.
Paint Color Selection Strategy for Oakland Homes
Choosing colors is where a lot of people get stuck. Totally normal.
Here’s a simple way to approach it.
Start with what you can’t change
Instead of starting with a paint swatch, start with what’s already in the room:
Flooring
Countertops
Tile
Larger furniture you’re keeping
Key artwork or rugs
Your wall color should support these elements, not fight them.
In many older Bay Area homes, you’ll see original hardwood with warm or reddish tones. That warmth needs to be considered when choosing grays, whites, and neutrals.
In newer lofts with concrete floors and metal accents, cooler, modern palettes often feel more at home.
A quick word on color psychology
Colors really do influence how a space feels.
Warm colors (reds, oranges, yellows, warm browns) add energy and coziness. They make spaces feel more intimate. Great for dining rooms or living spaces where you want a lively atmosphere.
Cool colors (blues, greens, purples, cool grays) create calm and spaciousness. They work especially well in bedrooms, bathrooms, and smaller rooms you’d like to visually “open up.”
Neutrals (whites, beiges, grays, greiges) are versatile and timeless. They’re often the best choice for main living areas, especially if you’re thinking about future resale.
Testing colors the right way (because paint chips lie)
Small paint chips are a good starting point, but they don’t tell the whole story.
Light in Oakland changes throughout the day, and foggy mornings or bright afternoons can totally change how a color reads.
Here’s a better approach:
Narrow your choices to 2–3 colors per room.
Buy sample sizes (most stores offer 8 oz) of each.
Paint large swatches (at least 2' x 2') directly on multiple walls—especially ones that get different light.
Live with those swatches for 3–4 days. Check them in morning, midday, afternoon, and evening.
You’ll quickly see which colors feel right and which ones bother you.
Creating flow throughout your home
You don’t need every room to be the same color, but you do want the home to feel cohesive.
A few ways to do that:
Use lighter and darker variations of the same color family in different rooms
Choose one main neutral that runs through hallways and key spaces, then add accent colors in individual rooms
In open-concept spaces, keep visible rooms in the same family so everything feels connected
Hallways and transition spaces are the “connective tissue.” Neutral colors often work well there.
Popular paint color trends
Local preferences tend to follow the architecture and light.
Soft whites and warm grays are popular in renovated and newer homes, giving a clean, modern backdrop.
Richer, nature-inspired tones—deep greens, blues, and terracottas—often look fantastic in Craftsman and Victorian homes, especially when paired with wood trim.
Accent walls still show up, especially in lofts and contemporary spaces. One bold wall can be enough to bring interest without overwhelming a room.
There’s also a growing interest in restoring original wood trim in older homes. When that happens, wall color choices shift toward tones that complement and show off the wood.
Working with diverse local home styles
Victorian homes: Often have darker floors, detailed trim, and smaller, compartmentalized rooms. Lighter wall colors help balance that and keep things from feeling too heavy.
Craftsman bungalows: These homes were practically designed for rich, earthy color palettes. Think sage greens, warm taupes, deep blues, and terracotta tones.
Modern lofts and condos: Concrete, steel, and glass pair well with cooler neutrals, dramatic charcoals, and bold accents.
When to hire a color consultant
If you find yourself stuck in “color paralysis,” bringing in a color consultant can be money well spent.
A good consultant will:
Consider your lighting and existing finishes
Help you avoid undertone surprises (like a gray that suddenly looks purple at night)
Pull everything together into a cohesive palette
We offer color consultation because we’ve seen what happens when a whole house gets painted in a color that looked great on a 2" chip but doesn’t work on the walls.
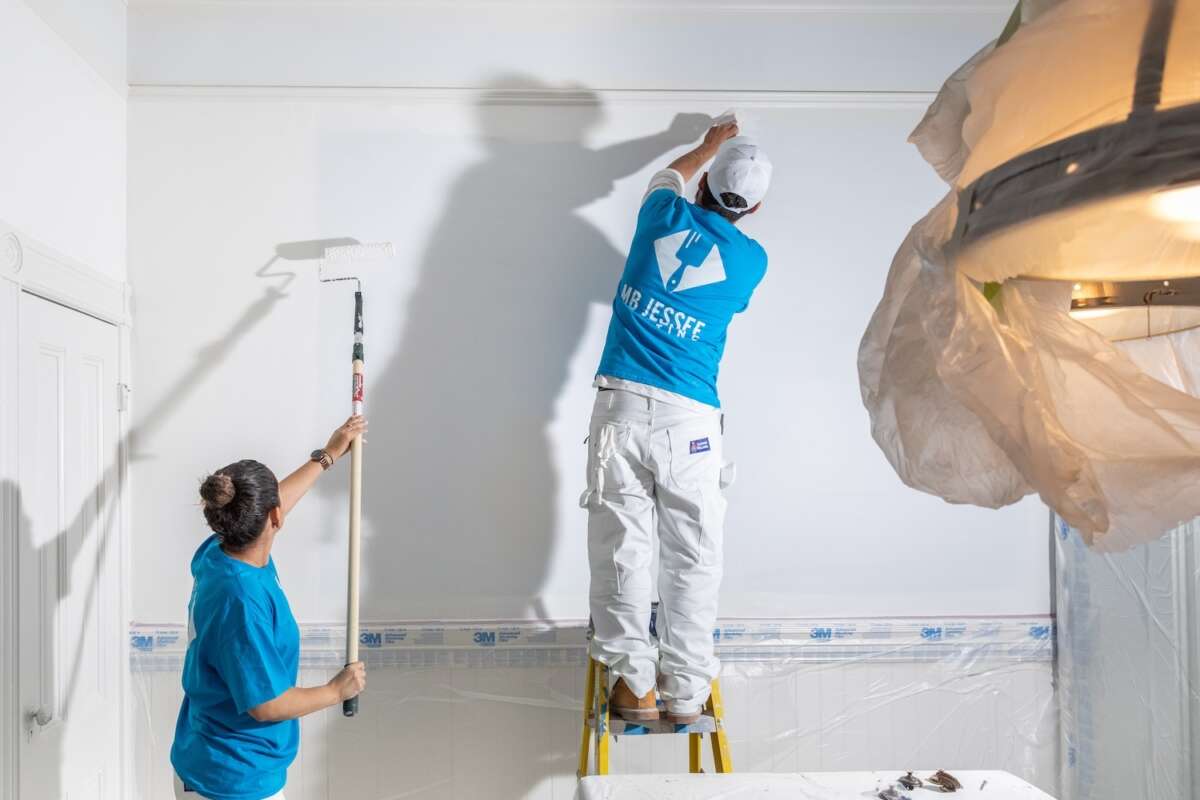
The Professional Interior Painting Process
Knowing what actually happens during a professional interior project helps set realistic expectations, and makes it easier to compare contractors.
Here’s how a typical project unfolds.
Step 1: Initial consultation and detailed estimate
A good estimate visit is not a 10-minute walkthrough.
Expect 30–60 minutes of:
Looking closely at wall and ceiling conditions
Discussing your goals and priorities
Measuring spaces
Noting repairs and prep work that will be needed
We’re evaluating:
Wall condition: Are there cracks, holes, stains, or prior repairs that need attention? Are we working with plaster or drywall?
Existing colors: Going from dark to light (or vice versa) adds coats and time.
Trim and detail: How much there is, what condition it’s in, and whether it’s being repainted or left as-is.
Ceiling height and access: Taller ceilings and tricky stairwells require more time and equipment.
You should also be talking about:
Colors and finishes
Rooms that are priorities
Your schedule and any timing constraints
A solid written estimate should spell out:
Which rooms are included
What prep work is included
How many coats are planned
Which products and finishes are being used
A timeline and total investment
Vague estimates are a red flag.
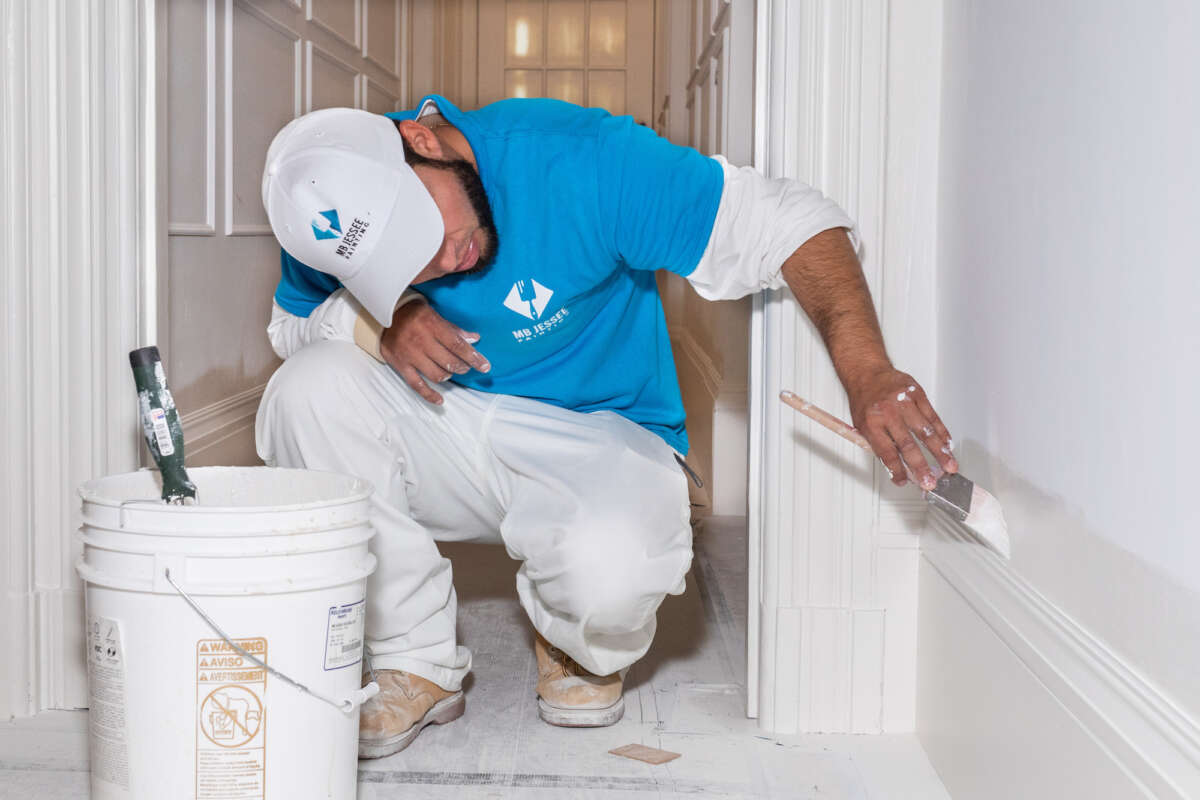
Step 2: Preparation — where the project is really won or lost
Prep is the least glamorous part of painting, but it’s what makes everything last.
Professionals often spend 40–60% of the project time here.
Furniture and floor protection
We’re not just tossing down a drop cloth.
Floors get covered and taped off so they’re fully protected
Furniture is moved away from walls and covered
Smaller items are either removed or consolidated and covered
In Oakland homes with original hardwood floors or custom tile, this step is non-negotiable.
Cleaning and degreasing
Paint does not stick well to dust, grease, or residue.
Walls, especially in kitchens, near entryways, or in older homes, often need to be wiped down before anything else happens.
Repairs
This includes:
Filling nail holes and minor dents
Repairing larger cracks or damage with joint compound
Addressing water damage or problematic areas
Plaster in older homes often needs different treatment than standard drywall. Rushing this step shows through later, no matter how good the paint is.
Sanding and smoothing
Once repairs are dry, everything is sanded smooth so the surface feels even and consistent.
You want the wall texture to disappear behind the paint, not fight with it.
Priming
Not every surface needs primer, but some absolutely do:
New or unpainted drywall
Larger repairs and patched areas
Dark-to-light color changes
Stained or smoke-damaged surfaces
Certain problem areas where adhesion is a concern
Skipping primer in those cases almost guarantees issues later.
Masking and taping
Proper masking protects:
Trim
Windows
Fixtures
Hardware
Floors and surfaces that aren’t being painted
Careful taping also helps create those crisp, clean lines that make the finished product look sharp.
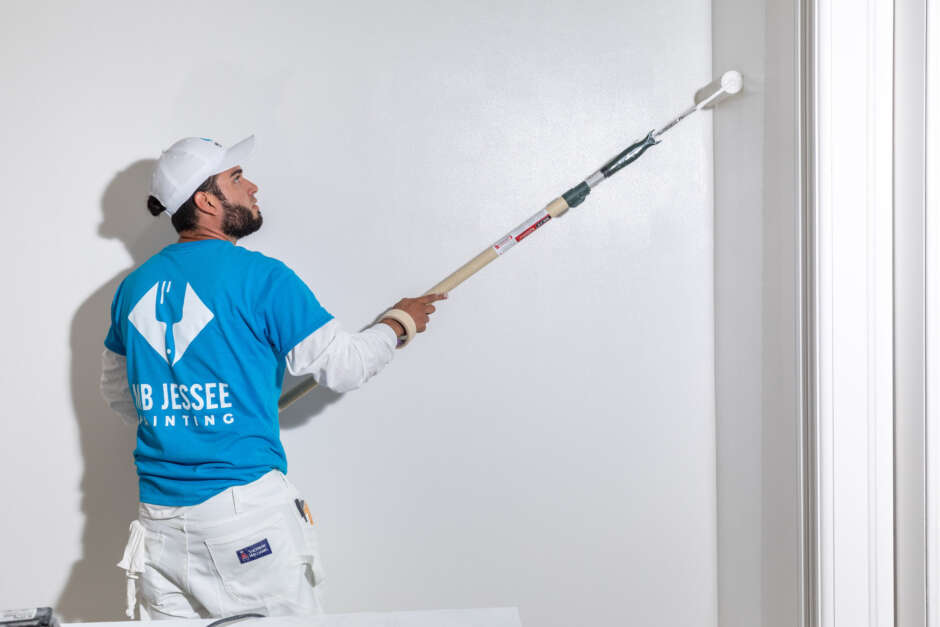
Step 3: Paint application
With prep done, the fun part starts.
First coat
Most pros use a combination of:
Brushes for “cutting in” along ceilings, corners, and trim
Rollers for larger wall sections
Sprayers in certain situations (usually in empty or new spaces with proper masking)
Cutting in is the detailed work that gives you clean edges. Roller technique is what keeps the surface looking even—no lines, no heavy spots.
Drying time
This part is easy to rush and hard to fix later.
Most paints need 2–4 hours between coats, sometimes longer if it’s humid or cool. In the Bay Area, foggy mornings and cooler days can slow things down.
Applying a second coat too soon can cause:
Drag marks
Uneven sheen
Poor adhesion
Second (and sometimes third) coat
Two coats are standard for a quality interior job. Dramatic color changes (especially dark to light) can require a third coat to fully cover.
A good contractor will explain when that’s likely upfront rather than surprising you later.
Step 4: Trim, details, and touch-ups
Walls are one step. The details are another.
Trim and molding
Trim usually gets painted separately from the walls, often with semi-gloss.
This work is slower and more detailed:
Window casings
Baseboards
Door frames
Built-ins
Crown moldings
In Victorian and Craftsman homes with lots of woodwork, this is where skill really shows up.
Doors
Doors might be taken off hinges and painted horizontally for a smoother finish. This helps avoid runs and heavy edges.
Touch-ups and inspection
A good crew will do their own inspection first, then walk the project with you. They’ll check for:
Missed spots
Light coverage
Small imperfections
Anything that needs adjustment should be handled while the tools and paint are still on site.
Step 5: Cleanup and final walkthrough
The job isn’t done until your home is clean and put back together.
Cleanup
Tape and coverings are removed carefully
Floors are swept or vacuumed
Hardware and switch plates are reinstalled
Furniture is put back in place
You should feel like your space is ready to use, not like you have hours of cleanup ahead of you.
Paint disposal and storage
You’ll typically be left with:
Clearly labeled touch-up paint for each color
Empty cans and debris removed from the property (disposed of or recycled correctly under local guidelines)
Final walkthrough
This is your chance to:
Ask questions
Point out anything you’re unsure about
Confirm that everything was done as promised
A reputable painter will also explain their warranty and what’s covered.
Timeline & What to Expect During Your Project
Knowing how long things take makes it a lot easier to plan around painting.
Typical project timelines
These are general ranges for an Oakland-area home:
Single room (bedroom, bath, office): 1–2 days
Multiple rooms (2–4 rooms): 3–5 days
Whole house (2,000–3,000 sq ft): 1–2 weeks
Timelines stretch when:
There’s a lot of repair work
Ceilings are high
There’s complex trim or woodwork
The color scheme is complicated
Weather affects drying and ventilation
Day-by-day: how it usually feels
Day 1 – Prep day
Expect:
Arrival around 8–9 AM
Furniture and floors being moved and covered
Wall cleaning, repairs, sanding, and priming
By the end of day one, your home will probably look messier than when the crew arrived. That’s normal. Prep isn’t glamorous, but it’s critical.
Days 2–3 – First coats
First coats go up on the walls. They may look streaky or uneven at this point. That’s okay. First coats are not the final look.
Days 4–5 – Second coats
Second coats usually go faster and look much better. This is where the transformation becomes obvious.
Day 6+ – Trim and details
If trim and doors are being painted, this will often happen after wall coats are done. It’s slower, more detailed work.
Final day – Touch-ups and cleanup
This is where:
Final touch-ups happen
Tape and coverings are removed
Everything is cleaned up
You do a walkthrough with your painter or crew leader
Living at home during the project
Most Oakland homeowners stay in the home while painting is happening.
You should plan for:
Limited access to the rooms being painted during the day and for several hours after fresh coats
Some noise and activity during work hours
Mild odor, even with low-VOC paints (ventilation helps)
If bedrooms or bathrooms are being painted, it’s smart to have backup options for a night or two.
If you work from home, you’ll want to think about noise, internet access, and where you’ll set up.
Pets should be kept out of work areas for their safety and to keep the project moving smoothly. Dog daycare or a closed-off “pet room” can be helpful.
When can you start using rooms again?
General rules of thumb:
Walk into a room: 2–4 hours after final coat
Move furniture back: after 24 hours
Hang pictures or shelves: after 7–10 days
Wash walls: wait about 30 days
Paint dries to the touch quickly, but it takes time to fully cure and harden.
Minimizing disruption
A few simple things make projects easier:
Clearing wall hangings and small items before the crew arrives
Planning around key spaces (like your only bathroom)
Communicating your schedule and any non-negotiables upfront
Being reachable for questions during the project
Cost & Investment: What to Expect
Let’s talk about the part everyone wonders about: how much interior painting actually costs in the Bay Area.
Here’s what surprises most homeowners: interior painting in Oakland and San Francisco costs more than the national averages you see online. Labor, materials, licensing, and the realities of working in older homes all play a role. Once you understand why, the numbers make a lot more sense.
What interior painting really costs in the Bay Area
Most professional interior painting runs $3–$6 per square foot of wall surface.
Important note:
That’s wall surface, not floor space.
A 150 sq. ft. room often has 500–700 sq. ft. of wall surface depending on ceiling height.
Here’s what that usually looks like:
Small bedroom or bathroom (100–150 sq. ft. floor):
$450–$1,200
Medium bedroom or office (150–200 sq. ft.):
$800–$1,500
Large living room (200–300 sq. ft.):
$1,200–$2,500+
Kitchens Walls:
$1,000–$2,500+ (prep and cleaning add labor)
Two-story stairwell or foyer:
$1,500–$3,500+ (height = complexity)
Whole-house interiors:
1,000–1,500 sq. ft. home: $5,000–$11,000
1,500–2,500 sq. ft. home: $9,000–$18,000
2,500–4,000 sq. ft. home: $15,000–$30,000+
These ranges reflect professional work using quality materials, full prep, and trained crews: exactly what you want for a job expected to last 7–10 years.
Why Bay Area costs are higher
It’s not just “because it’s the Bay Area.” There are specific reasons:
Skilled labor costs more here—the cost of living drives wages up across all trades
California licensing & insurance are strict (and expensive), but they protect you
Older Oakland homes require more prep, more repair work, and in pre-1978 homes, lead-safe practices
Parking and access often slow setup time
Height, detail, and architecture (especially Victorian/Craftsman homes) add complexity
Good painting takes time, and time is the largest part of the investment.
What actually affects your cost?
This is where estimates start to differ.
Wall condition
Small repairs are normal. But extensive cracks, plaster damage, water stains, or past DIY fixes increase time.
Ceiling height
8 ft? Straightforward.
10–12 ft? Slower.
Two-story foyers? Specialized equipment.
Paint choice
Premium paint costs more, but offers better coverage, richer color, and lasts longer.
Trim and woodwork
More trim = more detail work.
Historic homes especially take extra time.
Color changes
Dark → light or bold → white usually needs more coats.
Number of colors
The more colors you choose, the more masking, setup, and time required.
Access & logistics
Fourth-floor walk-up in downtown Oakland?
Narrow Montclair stairwell?
These all affect labor.
Where your money goes
Here’s the honest breakdown:
Labor: 70–85%
Materials: 10–20%
Business costs (insurance, licensing, equipment, vehicles): 10–15%
Painting is skilled, hands-on work. Most of your investment goes directly to the people doing the labor.
Why the lowest bid rarely saves money
That quote that’s 30–40% less than everyone else?
There’s always a reason. Usually:
No or minimal prep
Cheap paint
Unlicensed workers
No insurance
Rushed timelines
Unrealistic labor assumptions
We’ve repainted many Oakland homes within 2–3 years because the homeowner went with the lowest bid. They ended up paying twice.
ROI and value considerations
Interior painting offers:
50–70% ROI if you plan to sell
Significant improvement in how your home feels
Up to a decade of enjoyment from a single project
High-impact areas like living rooms, kitchens, and primary bedrooms offer the strongest day-to-day return.
Cost-saving strategies (the responsible ones)
You can save without sacrificing quality:
Keep color choices simple (fewer colors = less time)
Handle small prep tasks yourself (removing décor, clearing rooms)
Schedule during slower seasons (late fall/winter)
Focus on high-impact rooms
Choose durable, classic colors that won’t need frequent updates
When it’s worth spending more
A few areas are never worth cutting corners:
Surface prep
Premium paint
Trim and woodwork in historic homes
Lead-safe handling in pre-1978 homes
Professional crews vs. untrained labor
These decisions directly affect longevity.
Understanding estimates (and why they vary)
A good estimate should clearly list:
Areas included
Repairs included
How many coats
Specific paint products
Timeline
Warranty
Total investment
If you’re comparing estimates, ask:
“What prep is included?”
“What paint lines are you using?”
“How many coats are assumed?”
“Is trim included?”
“What happens if you find more repairs once you start?”
The more detail, the more trustworthy the estimate.
A quick perspective shift
A $12,000 interior project lasting 8–10 years breaks down to about $100–125/month.
A $7,000 low-quality job that fails in 2 years costs $291/month — and then you pay again.
Cheap work is the most expensive kind.
Choosing the Right Interior Painter in the Bay Area
Your choice of painter matters just as much as your choice of paint.
Excellent paint applied poorly will still fail.
Modest paint applied properly can look fantastic.
Here’s how to choose a contractor you can trust.
Essential qualifications (non-negotiable)
Valid California contractor’s license
Legally required for any job over $500. It protects you.
Verify at: cslb.ca.gov
General liability insurance
Protects your property if something goes wrong.
Workers’ compensation insurance
Critical if a worker gets injured on your property.
Local experience
Someone who understands Victorian plaster vs. drywall, lead-safe requirements, and Oakland microclimates is worth their weight in gold.
Clear communication
Responsiveness during the estimate is a preview of how they’ll handle your project.
Red flags
These are dealbreakers:
No license
No insurance
Asking for large upfront deposits (over 30%)
Cash-only
Vague estimates
No references
Pushy sales tactics
Price far below the others
“We can start tomorrow” when everyone else is booked out
Quality contractors stay busy and follow process.
Questions to ask during the consultation
“How long have you been painting interiors in Oakland?”
“Do you use employee painters or subcontractors?”
“What’s your prep process?”
“What paint lines do you use and why?”
“Are you lead-safe certified?”
“What’s your timeline?”
“Do you offer a workmanship warranty?”
“Can you provide recent local references?”
Good contractors welcome these questions.
How to evaluate estimates
When comparing estimates:
Make sure each quote is describing the same scope
Look for product specifics (brand + line)
Pay attention to prep details
Ask what’s not included
Understand how color changes affect pricing
Clarify timeline and crew size
A one-page quote with no detail is usually hiding something.
The MB Jessee difference
Since 1995, we’ve built our reputation by focusing on:
Employee crews (never subcontracted labor)
Careful prep and craftsmanship
Clear communication
Detailed estimates with no surprises
3-year workmanship warranty
Deep experience with Bay Area architecture and homes
We’re not the cheapest option. We’re the option homeowners trust.
Preparation Checklist: Getting Ready for Your Project
Preparation makes painting smoother, faster, and less stressful. Here’s what to do before, during, and after.
Before painters arrive
Clear wall space
Remove pictures, mirrors, curtain rods, shelves—anything attached to the walls.
Move small furniture and valuables
Nightstands, lamps, décor, electronics, fragile items.
Remove window treatments
Curtains, blinds, valances. These are hard to work around safely.
Clear the floor as much as you can
Open space = faster prep and better protection.
Secure pets
Dogs and cats need to be kept out of work areas. Many clients use daycare during active paint days.
Communicate special concerns
Antique furniture, delicate surfaces, timing constraints—tell your painter ahead of time.
Plan for limited access
If the bedroom or bathroom is being painted, plan alternatives for a day or two.
During the project
Keep pathways clear
Keep children and pets away from wet paint
Stay reachable for questions
Trust the crew—hovering slows everything down
If something concerns you, mention it immediately
Discuss bathroom access ahead of time
Maintain airflow when weather allows
After completion
Wait 24–48 hours before moving furniture back
Avoid washing walls for 30 days (paint needs to cure)
Keep leftover touch-up paint labeled and stored properly
Don’t hang heavy items for 7–10 days
Handle fresh paint gently at first—it's still hardening
Common Problems & How to Avoid Them
After nearly 30 years painting in your neighborhood, we’ve seen every avoidable paint problem imaginable. Here’s what typically goes wrong, and how to keep it from happening.
Problem #1: Poor surface preparation
This is the #1 cause of paint failure.
Skipping or rushing prep leads to:
Peeling
Cracking
Stains bleeding through
Visible repairs
Uneven sheen
Prep takes time. It’s not optional.
Problem #2: Wrong paint type or finish
Common missteps:
Flat paint in high-traffic areas
Eggshell in bathrooms
Cheap paint that needs 4+ coats
Glossy finishes highlighting every flaw
The wrong finish usually reveals itself the first time you try to clean the walls.
Problem #3: Rushed drying times
Impatience causes:
Drag marks
Uneven finish
Poor adhesion
Respect the recommended dry times. They matter.
Problem #4: Skipping primer
Primer is essential when:
Going dark → light
Painting new drywall
Covering patched areas
Dealing with stains or smoke
Transitioning from oil-based to latex
Skipping primer creates long-term issues you’ll see every day.
Problem #5: Color selection mistakes
These usually happen because:
Paint chips are too small
Undertones change in natural light
Colors weren’t tested on the wall
Existing elements (countertops, floors) were ignored
Testing large swatches saves you from expensive regrets.
Problem #6: DIY challenges
DIY is great for small projects—but interior painting is more technical than it looks.
Common DIY issues:
Visible roller marks
Drips and uneven sheen
Poor cutting-in lines
Inconsistent coverage
Wrong tools
Underestimating prep time
For high-impact rooms or historic homes, hiring a professional is usually worth it.
Problem #7: Hiring the wrong contractor
Hiring based solely on price leads to:
Poor prep
Cheap materials
No warranty
Unskilled labor
Safety and liability risks
Always verify license, insurance, and references.
Problem #8: Bay Area-specific challenges
Lead paint in pre-1978 homes
Historic plaster needing special treatment
Moisture issues in bathrooms
Foggy weather affecting drying
Complex architecture requiring experienced crews
Local experience matters more than most people realize.
Maintenance & Longevity: Making Your Paint Job Last
A well-done interior paint job should last 7–10 years in most Oakland homes.
Here’s how to help it reach that full lifespan.
Expected lifespan by room
Bedrooms: 8–10 years
Living/dining: 7–9 years
Hallways: 5–7 years
Kids’ rooms: 5–7 years
Bathrooms: 5–7 years
Kitchens: 5–8 years
What affects longevity
Traffic levels
Sunlight exposure (fading is common in west-facing rooms)
Moisture and humidity
Cleaning frequency
Paint quality
Surface prep quality
How to clean painted walls properly
Wait 30 days after painting before any cleaning.
Flat/Matte: very gentle, spot clean only
Eggshell: mild soap + water, soft cloth
Satin: more durable; good for regular wiping
Semi-gloss: handles stronger cleaning in kitchens/baths
Avoid:
Abrasive cleaners
Magic Erasers on walls
Harsh chemicals
Excess water
Touch-up guidelines
Touch-ups work best:
Within 2–3 years
On small areas
With leftover paint from the original batch
Large touch-ups or older paint jobs often require repainting an entire wall for consistency.
Signs it’s time to repaint
Fading
Stains that won’t clean
Peeling or cracking
Scuffs/marring in high-traffic areas
Outdated color
Preparing to sell
Preventing damage
Use doorstops
Pad furniture feet
Manage humidity
Address leaks immediately
Ventilate kitchens and bathrooms
Oakland’s climate is generally gentle indoors - moisture is the main thing to watch.
Creating Beautiful Interiors That Last
Fresh interior paint can completely reshape the look and feel of your home. It brightens spaces, updates style, and adds everyday enjoyment.
To get long-lasting results:
Choose the right finishes for each space
Invest in proper prep
Use quality products
Work with experienced, licensed professionals
Test colors intentionally
Maintain surfaces gently
Why MB Jessee for your interior repaint?
Since 1995, we’ve helped homeowners across the Bay Area transform spaces with careful prep, skilled crews, and professional project management.
What you can expect:
Employee painters (never subcontractors)
Over 30 years of experience with Bay Area architecture
Clear communication and detailed written proposals
Respect for your home, schedule, and belongings
A 3-year workmanship warranty
Long-lasting results you’ll enjoy every day
Whether you’re repainting a single room or a full home interior, we’d love to help.
Schedule a consultation with MB Jessee Painting today.
We’ll walk your home, discuss your goals, and provide a detailed, transparent estimate—no pressure, ever.
Let’s create a home you love coming back to.
Frequently Asked Questions About Interior Painting
Q. How long does interior painting take?
Single rooms: 1–2 days.
Multiple rooms: 3–5 days.
Whole interiors: 1–2 weeks.
Prep, repairs, drying time, and details all affect the timeline.
Q. Can I stay in my home during interior painting?
Yes. Low-VOC paints make this easier. You just won’t have access to the rooms being painted during work hours and for a few hours after fresh coats.
Q. What’s the best time of year to paint interiors in Oakland?
Interior painting works year-round. Fall and winter often offer better scheduling availability.
Q. How much does interior painting cost?
In Oakland: $3–$6 per sq. ft. of wall surface.
Typical rooms $450–$2,500+.
Whole homes $5,000–$30,000+ depending on size and complexity.
Q. Do I need to move my furniture?
We move large furniture, but removing small items yourself makes the process faster and protects your belongings.
Q. Best paint finish for bathrooms?
Satin or semi-gloss for moisture resistance and durability.
Q. Best finish for kitchens?
Satin or semi-gloss—both clean easily and handle cooking splatter.
Q. Best finish for bedrooms?
Eggshell. Looks great, hides minor flaws, easy to maintain.
Q. How do I choose paint colors?
Start with permanent elements (floors, counters). Test colors on the wall in large samples and watch them over a few days.
Q. Is low-VOC paint worth it?
Yes. Minimal odor, healthier indoor air, and excellent performance.
Q. When can I use rooms after painting?
Walk-in after 2–4 hours.
Move furniture after 24 hours.
Hang artwork after 7–10 days.
Wash walls after 30 days.
Q. What does proper prep include?
Cleaning, repairing, sanding, priming when needed, and full masking and protection.
Q. Should ceilings be the same color as the walls?
Usually no. White ceilings reflect light and make rooms feel more open.
Q. How often should I repaint?
Every 5–10 years depending on the room and wear.
Q. What if I don’t like the color after it’s painted?
Repainting is the only solution. Testing samples ahead of time prevents this.
Q. Is painting messy or disruptive?
There’s some disruption, but professional crews keep spaces organized, protected, and clean.